
So, I've wanted to try dying my own fabric ever since I met the lady down the street who showed me her process for dying. It was really complicated and time-consuming. You had to wash the fabric with this stuff mix it with that stuff then cut your fabric a certain size then do this then do that blah blah blah blah...ick.....that's way to much this and that and blah blah blah to do. There had to be an easier way. So, I found one. I'm sure its not as good as doing it the 'professional' way, but I sure had fun....and that really is the point , right? Here it is.
First, go to Walmart and buy the the Tulip tie-dye kit.

Second, gather all your supplies and bring them in the back yard. You'll need big cups, gloves, your fabric cut into manageable or fat 1/4 pieces and then dampened with water, plastic sandwich bags, a laundry basket (yes, a laundry basket) and a hose with a strong sprayer on the end ...oh, and wine or preferred beverage(optional).

Next, I dumped most of the dry dye into sandwich bags to save it because I knew I wouldn't want to use it all up at once. I left a small amount of dye in each bottle and added water. For a darker color, I used less water for lighter colors more water. It wasn't very scientific, but it worked just fine for my first try.

Here's where your laundry basket comes into play. Squirt a bit of dye in the bottom of the basket and swirl your fabric around in it. Cool! It's like a science project!

Once you get a nice color on the fabric, put the pieces in separate cups...

....and then (and this step is very important) take a break to go get a nice glass of wine.
Cover all the cups with sandwich bags securing them with the rubber bands that were included in the dye kit.

Sit down, enjoy wine, admire work.
Let the covered cups sit overnite to soak up their pretty colors.

Early the next morning.......
Clear a spot on the sidewalk and spray the crap out of your colored pieces. Spray until the water runs clear then wring extra water out.

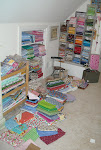
Next, wash and dry your fabric (separate loads for different colors) and fold it into pleasing little stacks.

Nice!


8 comments:
LOve it! thanks for making a tutorial--I too have been put off by the immense dyeing processes that I have read or heard about. this is totally doable!!
so, whatcha gonna make with 'em? Do I smell another project quilting entry?
outstanding - love your style and attitude ! You are a girl after my own heart - and isn't fun what it's all about ?
That is a nice quick and easy way to dye fabric. You have some very pretty pastel colors there.
Fabulous! You make it look super easy, and this is a great way to not get the washing machine all messed up. Maybe I will try this myself since you made it look actually doable!
Very Nice!! is the end result a solid color, or is it sort of 'swirly'? Just wondering. I love the subtle colors.
I left a long, complimentary, sarcastic comment days ago!?!?! Anyway... love the process and the colors.
How fun! If you ever want to come up and dye with Diane and I let me know! We used to teach classes but now I'm just doing it on an individual basis - we can try lots of things :)
hmmm...hadn't really thought about it -
probably just a small fee for the lessons ($25ish) and then you'd pay for the dye (we dye with Procion) by the weight of the fabric/clothing you're dyeing...
Post a Comment