Showing posts with label tutorials. Show all posts

Wednesday, April 4, 2012

How to Make Skirt from a T-shirt in 5 easy steps.

 Step 1.) Cut t-shirt off at armpits.
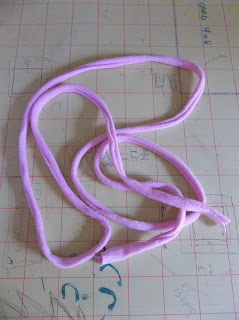
 Step 2.) Cut off a one inch strip. This will be used for your tie. Stretch this strip so it curls in on itself. (see next 2 pics)


 Step 3.) Sew the casing for the tie. Make this about an inch wide. 
 (note: the hem of the t-shirt is also the hem of your skirt:)
 Step 4.) Cut a small slit thru one layer of casing in order to slide tie thru.
 Step 5.) Attach a large pin to end of tie and thread thru the casing.

 TA DA!!! An adorable skirt made in less then 15 minutes!

 So far, I've made a pink one and a purple one.

I want one in every color! 

Tips:

*If you get your T-shirts from the thrift store, make sure to check for stains on the front of the shirt. Also make sure the backside is not printed on past the armpits.

* If you are a size small person, use a medium size t-shirt. I am a med/large size person so I used an extra large t-shirt for the purple skirt....which fits better then the pink skirt which was a large. I gave the pink skirt to my sister who is smaller then me and it fits her well.

* If you want your skirt to have lots of pleats, use a shirt that is really big. 

* I tried to make one from a polo shirt and when I tried it on, it just didn't fall as nice as the t-shirt skirts do.

 T-shirts waiting to be turned into skirts:)

Thursday, March 8, 2012

Tutorial. T-Shirt + Yarn = TARN

Buy a gently used t-shirt(s)at the thrift store or choose some of your own.....
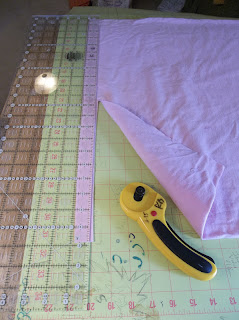
 cut off at armspits removing nekline and sleeves.

Fold in half and cut into strips leaving an inch uncut on the top.....

 ...unfold....

 Cut into strips. Start by cutting diagonally from strip one into strip two. This will make a continuous looooonnng strip.

After Tarn is cut, tug on it gently and it will curl into itself.

Roll into ball.

Big pile of Tarn. OH Joy!!


Ta Da! TARN! Now, wasn't that fun???

Sunday, November 27, 2011

Tutorial: Quilted Casserole Carrier in 6 easy steps.


.....and its reversible! The one I made above can fit a pie pan or a small,shallow casserole pan. These can easily be made for bigger pans by increasing your fabric and batting dize.They are so quick and easy to make and will make great gifts. I've made 4 already and am working on #5 and 6.

Wednesday, September 22, 2010

Monoprinting

I started an art class at Elgin Community College just for the fun of it and......its really fun! This is our teacher, Mary. She is demonstrating how to do mono-printing. Each week, Mary will be teaching us a new art technique. Last week we learned about using colored pencils. Next week, we'll be bringing the mono-prints back to class and embellishing them with chalk and colored pencils. 
Of course I couldn't wait to get home to play some more after class. Here's a little tutorial on what we learned.
First, gather all your supplies. I happily trotted over to JoAnns and bought a new set of watercolor paints. You will also need brushes, a piece of glass (from a picture frame works just fine), papers with different textures (different textured paper gives different looks (Some of the paper I used was from as old cookbook with recipes on them..see below), water, a paint tray and a spray bottle with water in it.

Begin by painting directly onto the glass. You can paint a simple picture or just place random color all over the glass and see what you come up with. I painted a simple flower.

You need to work fairly quickly as the paint dries fast. This is where the spray bottle comes in. If you lightly mist the surface of your painting, it will then be wet enough to transfer.
Next, place a sheet of paper over the top of your painting and press lightly.


Then, gently remove your paper and your image has then been mono-printed!

Very Cool! It looks so artsy!
(MFA will probably say it looks like kid art, but I will just stick my tongue out at her and blow raspberries  ;)

After it dries, you can embellish on top of it.
Here's some pears and eggplants I also did.The eggplant in the middle is on fabric...woohoo! One of the pears is on fabric, too. Let the embellishing begin!

Saturday, July 17, 2010

Project Quilting Theme: Stars Over America

Well, as you can see, I also took the theme quite literally. I thought of this idea as soon as I saw the challenge. All the fabric came from my scrap bag...which is really getting workout with these PQ challenges!

I started out by finding a template of the US on line and then printed it out in poster size I cut it out to make a pattern. I then sewed a bunch of scraps together to emulate the flag.( I didn't have a lot of royal blue fabric, so I used what was in the scrap bag instead of cutting into a new peice.) Once I had all the strips sewn together, I quilted it with a large stipple. I then traced my US pattern onto the peice.


 Before I cut it out, tho, I taught myself a new technique called 'couching'. I took skinny black ribbon (which is the other color I used for this quilt) and zigzagged (twice around) over it to make a nice outlined border. It 's a fun technique and I'll definitly be using it a lot!. I also used this technique with the stars. After outlining the US and the stars, I then cut them out.


My nephew, Jack, who is 6, was over yesterday and saw the almost finished wall hanging and said, "Oh Auntie, I love it, can I have it?" I said, "Maybe...." ....knowing for sure now where this piece was going to hang (in his room, of course!)


After I finished it the next day, I snuck over to my sister's house while they were at the pool and hung it up in his room. He was thrilled to have it, and I think I was even more thrilled to give it to him!

The US measures aprox. 30x19 and the stars are aprox. 8x8. All supplies came from my stash. I spent 0 dollars. I love that!!!

Final Score from the judges: 7.13

Saturday, July 3, 2010

How to dye fabric in your backyard or dying fabric hillbilly-style.


So, I've wanted to try dying my own fabric ever since I met the lady down the street who showed me her process for dying. It was really complicated and time-consuming. You had to wash the fabric with this stuff mix it with that stuff then cut your fabric a certain size then do this then do that blah blah blah blah...ick.....that's way to much this and that and blah blah blah to do. There had to be an easier way. So, I found one. I'm sure its not as good as doing it the 'professional' way, but I sure had fun....and that really is the point , right? Here it is.

First, go to Walmart and buy the the Tulip tie-dye kit.


 Second, gather all your supplies and bring them in the back yard. You'll need big cups, gloves, your fabric cut into manageable or fat 1/4 pieces and then dampened with water, plastic sandwich bags, a laundry basket (yes, a laundry basket) and a hose with a strong sprayer on the end ...oh, and wine or preferred beverage(optional).


Next, I dumped most of the dry dye into sandwich bags to save it because I knew I wouldn't want to use it all up at once. I left a small amount of dye in each bottle and added water. For a darker color, I used less water for lighter colors more water. It wasn't very scientific, but it worked just fine for my first try.

Here's where your laundry basket comes into play. Squirt a bit of dye in the bottom of the basket and swirl your fabric around in it. Cool! It's like a science project!

Once you get a nice color on the fabric, put the pieces in separate cups...

....and then (and this step is very important) take a break to go get a nice glass of wine. 
Cover all the cups with sandwich bags securing them with the rubber bands that were included in the dye kit.
Sit down, enjoy wine, admire work.
Let the covered cups sit overnite to soak up their pretty colors.
Early the next morning.......

Clear a spot on the sidewalk and spray the crap out of your colored pieces. Spray until the water runs clear then wring extra water out.


Next, wash and dry your fabric (separate loads for different colors) and fold it into pleasing little stacks.

Nice!