Saturday, June 26, 2010

Project Quilting - Challenge 4 - Bulletin Board

The directions were:
For Challenge 4, we're going back to something a little more traditional.
1. The inspiration for this week is the Log Cabin block.
2. Use as many fabrics as you like, but use both the front and reverse sides of at least one of them.
3. Maximum size is 36" x 36".


Here's what I came up with:


I started this project not knowing what it was going to turn into. I started be making 4 12" log cabin blocks from 3 inch strips of vintage linens. I ended up using only 2 of the blocks which I then cut in half. I still didn't know what it was going to be so just started fooling around with placement, adding the white to the triangles and a frame came to mind. Added large orange ric rac to peek out. Somewhere along the way I was thinking...maybe a big photo in the middle......then I thought ...bulletin board! The back is four 12" pieces of cork held together with heavy duty tape. I then quilted the top leaving the middle unquilted so that it would 'pop' and added some yellow ricrac (I heart ric-rac). I then stretched it over the cork and secured the piece to the back side. More ric-rac for hanging and it was done. I think it turned out great! Oh, I almost forgot....the fabric in the very middle and on the sides are the backside of that fabric.

I hot-glued large beads to the plain tacks to jazz them up a bit. Everything came from my stash except the cork. This piece and is now hanging in our kitchen. It measure 24" X 24".


Update: July 5, 2010
Score from the judges: 6.83 (out of 10). Not so great. Oh well......;)

Tuesday, June 22, 2010

AWE-SOME!

I've been blessed to help at least three of these beauties into the world. The last one, Obadiah, didn't want to wait for me or the doc to get there, so daddy caught him! He was born on Father's Day after a 90 minute labor for mom. Yep, you counted right....he's #10 for this family.

Saturday, June 19, 2010

Auntie says......


Top Ten Reasons To Try "PROJECT QUILTING"


10. You'll challenge yourself

9. There's a prize for public vote winner

8. Judges will critique your project and you'll get compliments

7. Each entry goes in a random drawing for a prize

6. You'll get a finished project in just one week

5. You'll push yourself out of your comfort zone and learn new things

4. There's a prize for Judges' winner

3. Judges will critique your project and you'll get advice for making improvements

2. There's an awesome prize package at the end of the season for the overall winner


And the number one reason to try "project QUILTING"....

It's FUN!

Are you convinced yet? Join us this week! Challenge rules will be announced Sunday at noon at

Friday, June 18, 2010

Mr Fix-It

"HMMMM...looks like we'll need to take this tire off."
Gruuunnttttt..."Up you go....mommy, could you help me?"


"Yep, as I suspected....they both need to come off."
Jessica's (Danny's girl) little guy ,Kyle, working hard. So stinkin' cute!

Wednesday, June 16, 2010

Jerry's tats......I am so telling on you.....moooooooommmmm!!!!!!!!!!!!!

First tat Jerry got (that I know of) was a grid and a dot....get it? I didn't.... I needed expanation....but now I forgot what the expanation was....
I guess the first one wasn't enough....here's the next one.....fish, flowers....I bet its feeling good this morn...ouch!

Oh , Jerome........

Sunday, June 13, 2010

Project Quilting - Season One - Challenge Three

Wow! This project was right up my crafty alley! 
This challenge, the directions were: 1. The front, back, borders, binding and embellishments should all be made from materials that have had a previous life as something else.
2. You may use new thread and batting.
3. Your project should include at least 3 different materials used as embellishments.


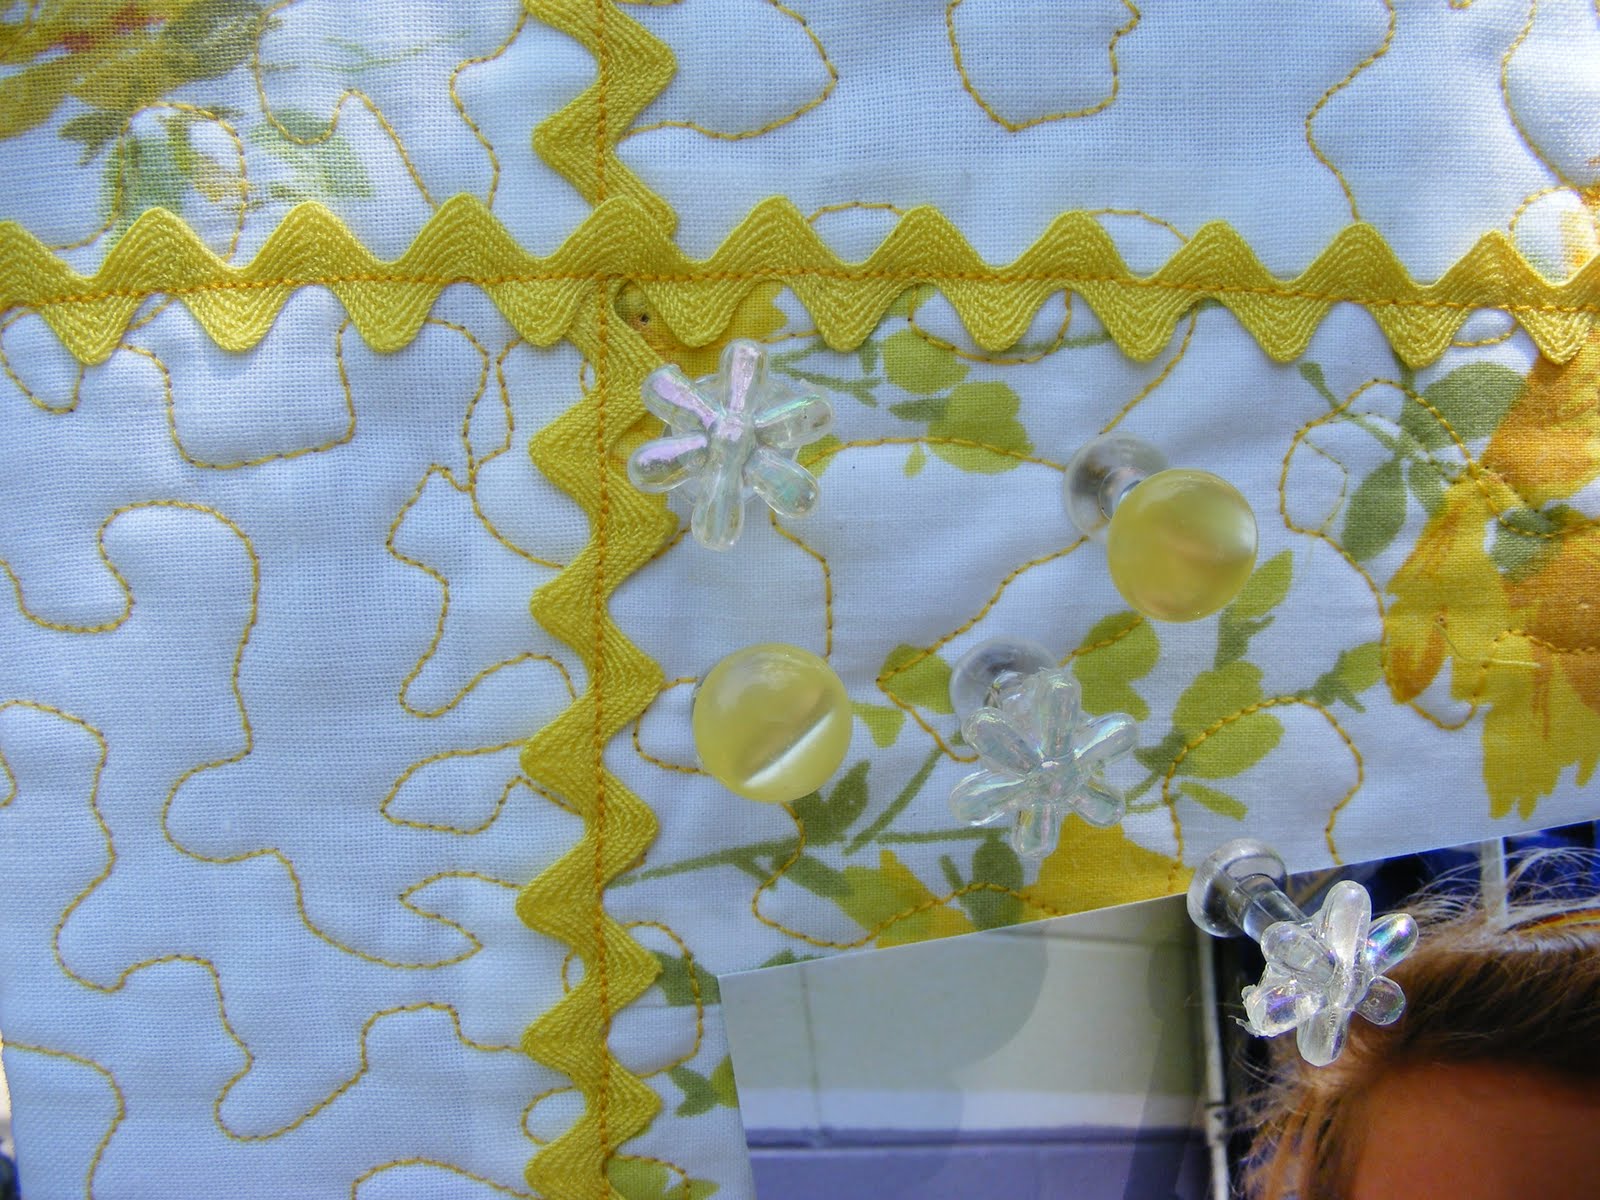
 I started with two pillow cases..one white and a flowered one. I then quilted the white case starting at the top with blue threads and then fading down to the bottom with green threads. I then used an old green button down shirt for all the greenery and the binding on the peice.I then cut up the flowered pillow case and thread painted them to the quilt. The embellishments I added were the buttons from the shirt, flower beads from a kids necklace, barrettes that my neices were too old to wear and flowers from an artifcial flower arrangement.(btw...you can't really see the shirt buttons as they are under the flower beads. I just used them to make the flower beads 'pop') The butterfly trail of beads are from a big bag of sparklies I got from the thrift store a while back. Everything I used was from stashes I already had which had been purshased from the thrift store..... Including the thread! So that means I recycled stuff that had already been recycled!

Aprox. cost for all supplies was about $2.00.

Quilt measures 24" x 18".

Oh, and one more thing. I know some people might turn up their noses at my thrifted supplies, but I love using recycled items in my crafts...it makes me feel so very green!


Head over to Kim's Crafty Apple and give me a vote. Thanks!


Update: June 19

Avg score from judges: 8.2...which was good enough for 3rd place...woohoo!

Friday, June 11, 2010

The BIG 5-0!!!!!!

A BIG Happy Birthday to Auntie Col! 50? No worries...its the new 30! Have a great day!

God is so good!

This is a shot of a mom and her mom from a birth I attended last week. It was such a sweet and awesome moment. Grandma has been blind since last year after struggling with liver disease and a subsequent transplant. As her daughter greeted her that morning, there was such joy and excitement in the room as we awaited the birth of her 5th baby. Grandma held her daughter and prayed and praised God for all the blessings He has bestowed on them. It was quite moving as this family has struggled with a lot in the past several years including their 3 year struggling with leukemia (who is fully recovered and 7 years old now). It was so great to see folks who have been thru so much adversity and yet stay so completely faithful to God. They were a true inspiration to me. Oh, BTW, she had a beautiful 8 lb 14 oz baby boy. I think they named him Christian.

Friday, June 4, 2010

Thread Painting

I thought I'd try my hand at some thread painting and I really enjoyed it. I love the end product and am looking forward to trying some more. Here's the photo I started with:
This was a pic I took a few years ago in South Haven, MI.

       I first prepared my fabric to print on by ironing a piece of 8 by 10 white cotton. I used plenty of starch to make it nice and flat. I then taped the edges of the fabric to a piece of card stock and ran it thru my printer. The picture turned out just 'ok' on the fabric but that didn't really matter since I was going to 'paint' all over it.

 I then pulled all the thread colors I thought I would need.

 I used my quilting/embroidery foot, lowered my feed dogs and went to town painting. I changed only the top thread color and left the bobbin thread white which made things a bit easier when switching colors.

Here's how it turned out:
I think it looks pretty good. It was really fun, too.